How to create Direct Buy Links for your Products
Since social networks like Facebook, Instagram and Twitter offer the best opportunities for inexpensive product promotion, with Buy Links, you can ...
Ready to start selling online? You have come to the right place! We will break down the 10 steps you need to take to get you started today!
Before you start following these steps, create your store.
By the end of this guide, you will not only know how to sell online but also have access to further ways to make your business stand out from the pack.
It’s important to highlight that most of the following steps can also be done while you are on the free trial period.
What are you going to sell? If you already know the answer to that question, great! You are better placed for success than 60% of the people who create online stores. You will also be able to import an existing inventory. More on that in a bit!
Note: If you need some help with finding products to sell, don’t worry! we’ve got you covered! In this case, head over to our Dropshipping with Syncee guide first before you proceed.
To create your products go to the Admin Panel > Products > All Products.

In case you already have an inventory of products in CSV format, click “Import” to upload all the products at once.
If you don’t have any, click “Add Product”.
To increase the chances of visitors buying a product every detail counts on this page.
Your product name should make it clear what the product is. Try to keep it short and use your product description or variants to give other specific information or product options, such as colors or sizes.
As an example, the product name will be “Basic Relaxed T-shirt”.

Grouping your products by categories is a very convenient strategy to create a better browsing experience for your customers, allowing them to find easily what they want to buy and create collections (like summer sale, winter collection, etc.).
When you create a product category, a page containing them will automatically be generated.
In this case, you can first create a category “Men” by clicking “Add category” and then create a subcategory “T-shirt” by selecting ”Men” as the parent category.


Learn more about creating and configuring categories.
Important: Creating categories does not add them to the store navigation menu. You will do this in the next step.
Product descriptions describe and sell your product. When writing it, take into account the following:
For a product like a t-shirt, customers usually care about the following details in particular when making a purchase: composition, style, size, brand, color, and how to wash it.
Based on the pointers we’ve given, here’s what the description of the product could look like:

Learn more about the creation and configuration of products.
A good product image can be the difference between a product catching a customer’s attention and losing interest.
To help with the product presentation, remember that:
The first image on the top left corner is the image that will be used as the thumbnail. You can click on “Click to add an Image” to start adding images, or you can also drag and drop.


After uploading all the images, you can reorder by dragging them in the order you prefer.
Learn more about how to take quality photos.
In the properties section, you can set the price, brand, SKU, stock, and google product category.
Regarding the price, you should first calculate the cost of producing your product to make sure you’ll be getting profit from selling it in the first place.
In this example, it costs 5$ to produce this t-shirt, so by selling at 15$ a shirt, there’s a reasonable profit, allowing potential promotions and margin for increases in production costs.

Besides production costs, there are also price elasticity and pricing strategies to take into consideration when setting up your prices.
In the shipping section, enter the product details regarding its size, weight, and package format. Since in this case the product is a t-shirt, we can keep the package format as “box”. This information is used by shipping companies to calculate part of the cost of fulfillment.

To add more detail to your products you can use Product Options. Here you can generate variants and assign each of them specific properties (color, weight, SKU, stock, price).
This is especially useful for products like our t-shirt, which comes in multiple colors and sizes.
Click on “Add product options > Add”, select the type of option you want to create, and add the options.

Now you can edit the image of each variant by clicking on it, and also the stock and price of it. We can set the navy blue and dark green shirts as more expensive than the black and white shirts.

You can have the best products in the world, if no one finds them it’s as if they don’t exist.
That’s why Jumpseller already optimizes your store to be SEO friendly and allows you to further customize how your product pages appear on search results.
SEO is a world on its own, but there are a few things you should consider, that can have a big impact on your chances of appearing on search engine results:
To edit the search result preview, click “Enable edition”.

You can also add attachments, custom fields, and more to your product page.
But for now, these are the essential steps to add a product.
Once you are done, click “Save” at the top of the screen and preview our product page to see what it looks like.
Once you have defined the categories of your products, add each one to the navigation menu of your store.
You do this by going to your Admin Panel > Navigation > Main Menu and clicking “Add item”.
Select categories > search for the category you created (in this case it’s “Men”) and tick “Add subcategories” so that the “t-shirt” subcategory also shows up. Click on the tick when you are done.

Learn more about how to set up the main navigation menu of your store.
All new stores are created with the default Jumpseller theme.
To see what is your active theme and/or to choose another theme go to the Admin Panel > Themes > Gallery.

As you can see, each theme has its own structure, style, and sections. Take a closer look at each one by clicking on the eye icon next to each theme.
Once you’ve chosen the theme you would like to change to, click on “Install”.
Now that you have the most adequate theme for your store, you can begin personalizing it to your business needs.
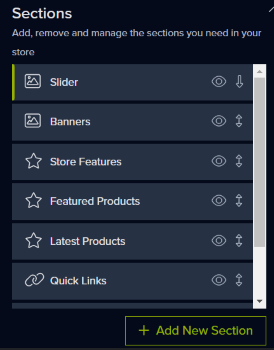
The first thing you’ll see is the sections list. Sections are the building blocks of your store. You can add sliders, testimonials, banners, videos, and more (depending on your store theme) and easily order them by dragging and dropping.

Click “Edit settings” to access more options to customize your store like fonts, the number of products that are shown in a slider, colors, etc.

Once you are done, click “Save”.
Review our information on theme customization.
To add a payment method, go to Checkout > Payments and click on the drop box field, choose the one you want and click “Add method”. Then you can customize its name and other configuration options.

Check the payment gateways you can offer to your customers.
If you want to enable/disable a payment gateway without deleting your settings, you can do it by clicking on the slider button next to the respective payment gateway.

If you are not sure which one to use, consider criteria such as:
Regarding which shipping methods to add, think a bit about how you want to get your product to your customers after a purchase.
If for example, you are thinking about making home deliveries, you could add a cash-on-delivery option, so that customers pay you when you deliver the product with the added cost of transportation.
Another very popular option is for customers to pick up your product in your physical stores, in that case, a flat rate would be more adequate since the cost of delivery from the warehouse to your store doesn’t usually fluctuate.
If you want to offer free shipping over X total order value there’s also the free shipping method.
None of these methods are mutually exclusive, you can add all of them. What you have to think about is which ones make sense for your business both economically and customer-wise.
Check our order fulfillment guide to learn more about this topic.
To add a shipping method, go to Checkout > Shipping, select the shipping method you want and click “Add method”. After that you can customize it however you like, even changing its name.

If you want to enable/disable a shipping methods without deleting your settings, you can do it by clicking on the slider button next to the respective shipping method.

There are also more precise configurations you can create like shipping zones to restrict certain geographic zones in which shipping methods are available.
So in our example, since we are located in England, we will create a shipping zone called “home deliveries” where if the customer’s shipping address is in England the only option that will appear is “cash-on-delivery” and “flat rate” since we can easily deliver it to them or to our store. On the other hand, we’ll create another shipping zone for “long-distance deliveries” for the remaining regions of the United Kingdom that aren’t England, and add all the other shipping methods to it. That way, you don’t receive farfetched fulfillment orders.
To create your own, go to Checkout > Shipping Zones, type the name of the zone (this is only for you to organize it, it won’t be shown to the customers), and select the location of the zone (country and region) and the shipping methods. When you are done, click “Save” at the top.
Finally, go back to the Shipping zones main menu and toggle the “Use shipping zones in checkout” so that the shipping methods in the checkout will be influenced by these shipping zones.

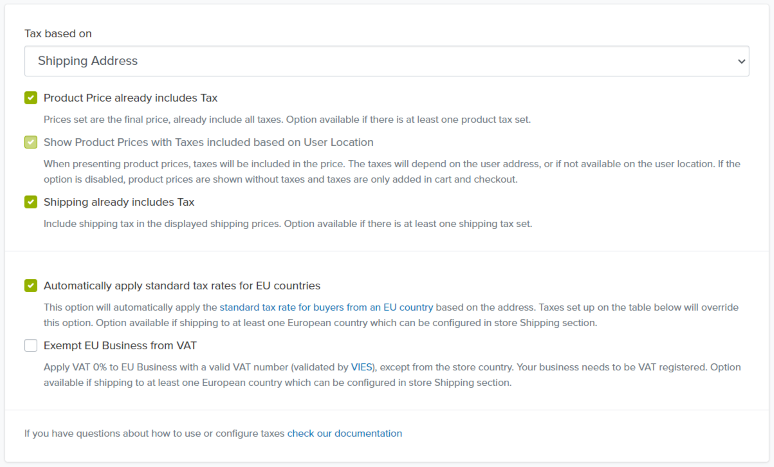
Jumpseller will apply the default sales tax around the world. However, we offer very detailed taxes options so you can create custom configurations for certain situations where it may be required.
If you have a store in the EU, there’s also an option to automatically calculate the tax that each product should have.
To create specific tax regulations or change how the default ones work go to Checkout > Taxes.

In this case, since we want to be as transparent as possible about the cost of buying the t-shirt, the “product price already includes tax” and “shipping already includes tax” options were activated, so that customers can check the final price before they go to checkout.
To create buzz around your store right from the start, promotions are usually a good way to do it. There’s a number of promotion strategies you can use.
You can create various types of promotions in Jumpseller:
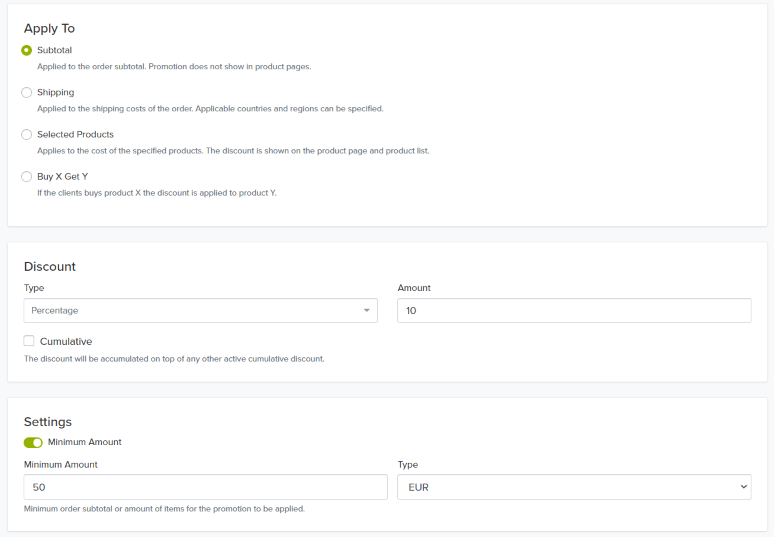
For example, we could create a promo code “SUMMERSHIRT” with 10% discount for orders over 50€, that you can share with influencers or on your social media profiles/pages so that you can easily track which channels are bringing you the most clients.
To create a new promotion, on your admin panel go to “Promotions” and type your discount name, coupon code, usage limit, and limit per customer.

After that, select the type of promotion (Subtotal), type of discount (percentage or amount), and the minimum sale amount to trigger it (optional) and click “Save”.

With an online store you can already reach users from all over the world, but what if you could increase that reach to other channels besides google search?
Our sales channels give you that benefit, letting you sell through:
The best part is that all you have to do is install any of them to start selling, all the inventory you created on your online store is automatically synced.
To install any of these, go to Sales Channels and click “Install” on the sales channel where you would like to begin selling.

One way to increase trustworthiness next to your customers is to have a business email with your store name on it.
You can create one on Gmail. Let’s imagine you have a store named: “Organic Clothes”, your new email address could be “organic-clothes@gmail.com”.
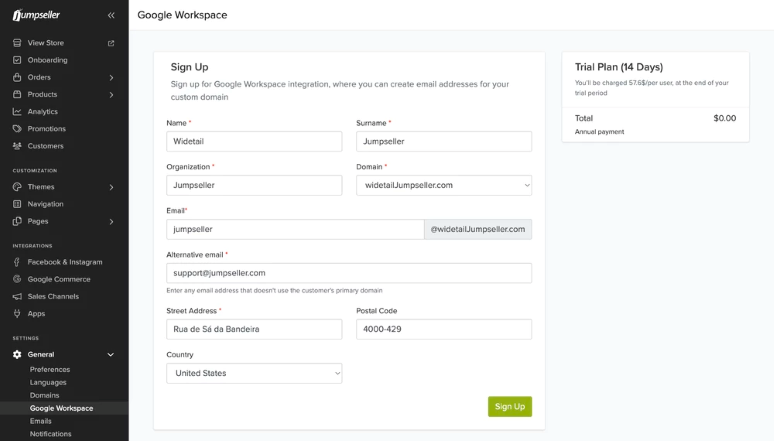
To make it more professional, you can use Google Workspace to have personalized text instead of “@gmail”, like “support@organicclothes.com”.
Since Jumpseller has an integration with Google Workspace, you can create it right from your admin panel by going to General > Google Workspace and filling out the information. You must have a custom domain before being able to use this integration.

By default, all emails sent to your customers will come from the address no-reply@jumpseller.com displaying the name of your store. You can change this “from:” email address to an existing one exclusively on the Premium or above Plans.
In order to change the address, go to General > Emails, edit the “FROM Email Address”field to your email address, and click “Save”.

An online store needs to comply with a set of rules and regulations to protect both the store owner and the customer, in case something goes wrong.
Jumpseller helps you with that by providing standard template pages that you can add to your store and edit to suit your needs.
In order to do that, on your admin panel go to Pages > Legaland click“Use our Template” to generate our standard template.


After that, you can either edit some parts of it first or click “Save”.
Important: Don’t forget to add the pages you just created on the navigation menu.
Whether you have plans to grow your store worldwide or only at a local level, you will always have customers from different languages visiting your store.
With Jumpseller’s multilingual feature, you can easily add other languages besides your main one.
On your admin panel, go to “General > Languages”, click “select new language”, select from the list, and click “Add”.

Click on the new language you added and click on “Translate All” to make sure everything is translated.

There are a number of components that together form your branding, you can edit almost all of them by going to General > Settings.
Starting with the store name - This is what will appear on search results as the title of your website so we want to keep it short and straight to the point. In our example, it can be: “Organic Clothes | Sustainably Sourced Fabric” since this is our core selling point.
Regarding the store description, similar to the product page, complement what was said in the store name and add important keywords that you would like to rank for on google search results.
In our case, we can add our business philosophy so visitors already know what to expect: “We sell organic clothes made from sustainably sourced fabric for the responsible consumer. Clothing can be cheap without worker exploitation. Our company is living proof of that motto.”
Moving forward to the visual branding, in case you have a logo, you can add it here by dragging and dropping or clicking on that section. For our organic clothes store, we’ve created a logo from an online generator, there are a variety of options like Canva, Freelogodesign, and Logo.
The same thing can be said for the favicon, which will appear as the icon on the tab of any of your store’s pages, and if you haven’t one already you can use generate it from your logo on websites like Favicongenerator or Favicomatic.

Don’t forget to add your social media profiles to your store, that way customers can click on them to get access to your other channels easily.
To do that, go to the Social Media section and click “Edit information”.

After having configured all the essential information and options of your online store, now it’s time to make your store public for everyone to see and start getting visitors.
By default, all stores that are on the trial period have a “disabled” status, which means customers can’t access it unless they know the store password.
To make sure your store is accessible to everyone, go to General > Preferences and on the Store Status field, check if it’s “Available”.

If you aren’t ready yet, or whenever you would like to do changes to your store without customers being able to see them, use the “Disabled status”, which also allows you to customize the disable message that is shown when someone visits your website, and the password to enter it.

That’s it, now you’ve taken the first steps to begin a successful online business. There’s plenty more to explore and configure on Jumpseller to take your store to the next level, but for now, you are all set.
For any questions you may have, you can contact us.
Free trial for 14 days. No credit card required.