Install TikTok Pixel on Your Online Store
TikTok’s pixel is a code that allows you to track and understand the actions users take on your website. When a user gets to your site, the pixel f...
The combination of Conversions API with other Facebook Business Tools allows learning more about how customers connect with the company. To help maximize the effectiveness of the website events, use the Conversions API in addition to the Facebook Pixel.
Website events sent through the Conversions API are related to Facebook Pixel and behave in the same manner that events delivered through the Pixel do:
The Conversions API creates a connection between an advertiser’s marketing data and the Meta systems! Here are the main benifits of this:
Apple’s iOS 14.5 update forces developers to give users an option to opt out of every tracking in their applications. This is something that affects every single business that relies on Facebook Ads to reach their audience, as now target audiences with iOS devices are going to be harder and more expensive to reach if users don’t opt-in to Facebook Tracking. This affects the most-used technique to track conversions; the Facebook Pixel. Ad-blockers will also block the Facebook Pixel, regardless of cookie settings. Conversion API is the solution to this problem.
Go to events manager, logging in to your Facebook account.
Select a business account (create your business portfolio if you haven’t already).
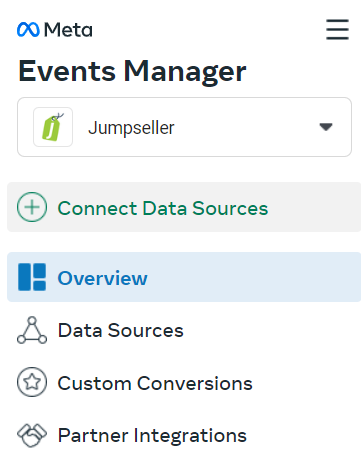
Click “Connect data sources” in the left sidebar
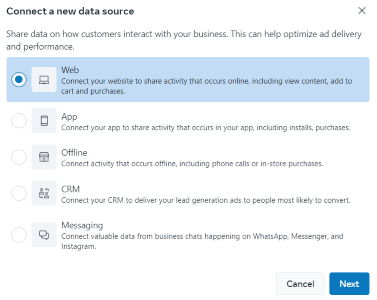
Choose “Web”
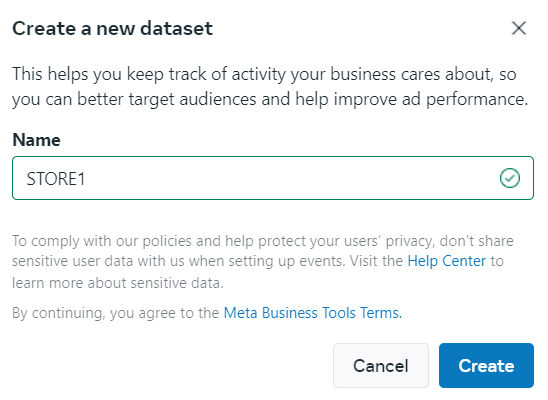
Name your dataset where all relevant data will be stored
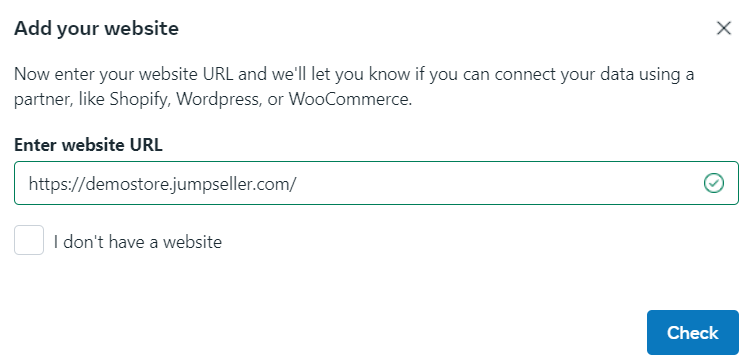
Enter store’s URL (e.g. demostore.jumpseller.com)
Choose to “Connect manually” > “Meta Pixel only” and copy the dataset ID
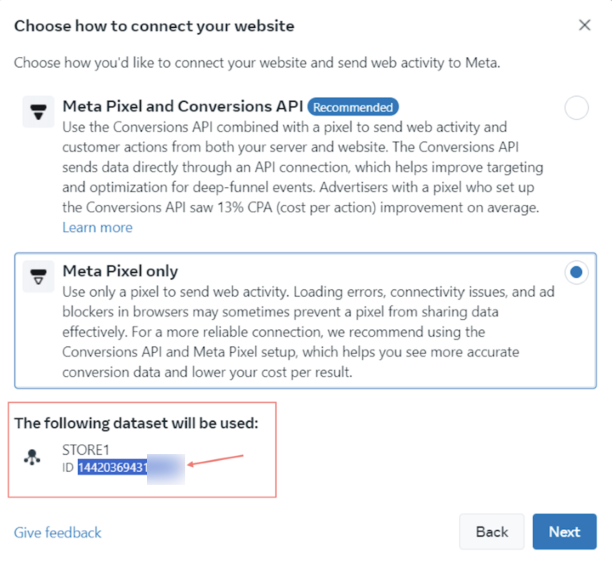
Close the window asking to manually install the code or use a partner integration (Jumpseller already has the code installed)
Paste the ID you’ve copied in the previous step into the Facebook Pixel field inside Jumpseller’s General Settings

Install Facebook Commerce
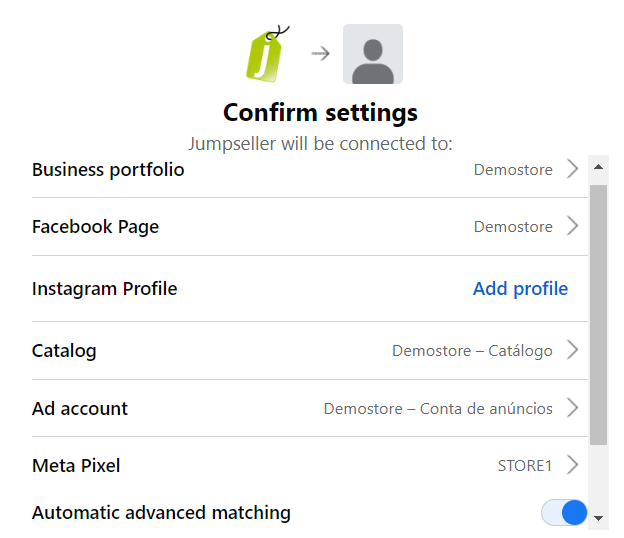
Login to FB Commerce; during the login, choose one of your existing Pixels or create another one (inside the “Meta pixel” option)
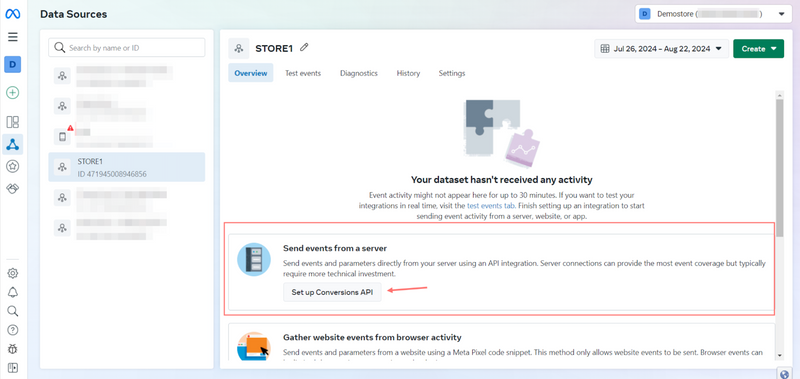
If you created a new pixel or chose one with an unfinished configuration, go to events manager select one of the pixels and click “Set up Conversions API”.
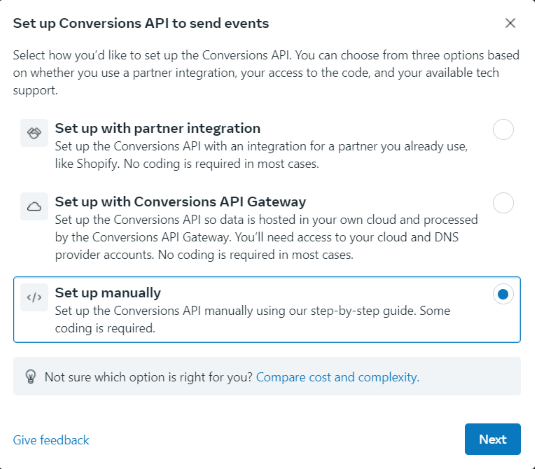
Select “Set up manually”.
Choose the events we support via the API & Pixel. Selecting the category “Ecommerce and retail” will show the most relevant events. They may already be selected, as Meta registers events on your website.
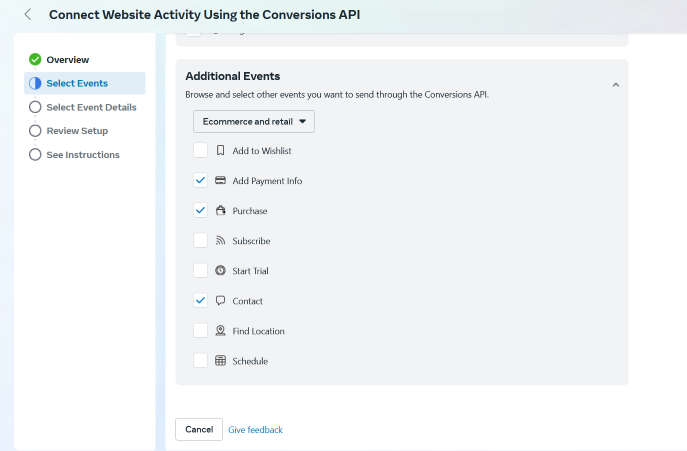
Here you can click “Continue” to finish the configuration with the default event parameters.
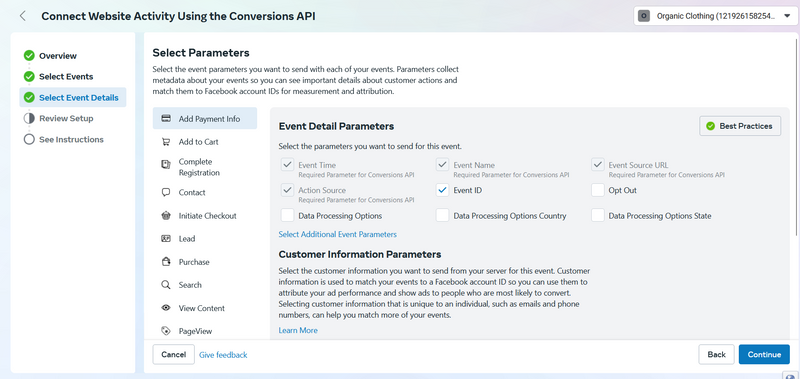
When reaching “See instructions”, click “Finish”, as Jumpseller already has all the necessary code installed.
All events sent via Conversions API (Server) are also available on the Pixel (Browser), however, they’re only sent via the API if it is available.
| Event | Source | Description | Trigger |
|---|---|---|---|
| PageView | Browser | View any page | Visits any static Page |
| Search | Server | Submit a search query | Visits a Search page |
| ViewContent (Category) | Server | View page of category | Visits a Category page |
| ViewContent (Product) | Server | View page of product | Visits a Product page |
| Contact | Server | Submit contact form | Submit contact form |
| AddToCart | Server | Add product to cart | Add product to cart |
| ViewCart | Server | View Cart page | Visits the Cart page |
| InitiateCheckout | Server | View first page of the Checkout process | Visits Checkout page |
| AddPaymentInfo | Browser | View Checkout’s page after adding payment info | Visits Payment Page in Checkout |
| Purchase | Server | 1st time Reaching the final Checkout Success page | Visit to the Success page |
| CompleteRegistration | Server | Customer registers in store | Customer is registered |
| Lead | Browser | Customer logs in or registers at store | Visits log in page |
It’s important to mention that all events marked as “Server” (Conversions API) are also available in “Browser” (Pixel). However, they are only sent through the API if it is configured.
Default Pixel Behviour. No extra parameters (data) sent.
{
  source: 'website',
  content_ids: data.content_ids,
  contents: data.contents,
  content_type: 'product',
  search_string: searchString
}
{
  source: 'website',
  value: data.single_value,
  currency: 'store.currency',
  content_name: document.title,
  content_type: 'product',
  content_ids: '[productA.id, productB.id]',
  contents: '[{id: productA.id, quantity: 1, item_price: productA.price},{id: productB.id, ...}]'
}
{
  source: 'website',
  value: 0,
  currency: 'store.currency',
  content_name: document.title
}
{
  source: 'website',
  value: 'order.total',
  currency: 'store.currency',
  content_name: document.title
}
Our pixel via browser only sends events when a page loads. Since a product can be added to the cart multiple times (via Javascript) without reloading the page, depending on the theme, it is not suitable to send this event through the browser, as we wouldn’t be able to send multiple events on the next page.
{
  source: 'website',
  event_name: 'AddToCart'
  user_data: {
    client_user_agent: user_agent,
    client_ip_address: ip
    info: {
      em: customer.email
      ph: customer.phone
      fn: customer_shipping_address.name
      ln: customer_shipping_address.surname
      country: customer_shipping_address.country
      ct: customer_shipping_address.city
      zp: customer_shipping_address.postal
    }
  }
  custom_data: {
    content_type: 'product',
    contents: [{ id: cart_productA.id, quantity: cart_productA.qty, item_price: cart_productA.price }],
    content_ids: [productA.id],
    content_name: productA.name,
    currency: order.currency,
    value: 'productA.price'
  }
}
{
  source: 'website',
  value: 'order.total',
  currency: 'store.currency',
  content_name: document.title,
  content_type: 'product',
  content_ids: '[productA.id, productB.id]',
  contents: '[{id: productA.id, quantity: product.qty, item_price: productA.price},{id: productB.id, ...}]'
}
{
  source: 'website',
  value: 'order.total',
  currency: 'store.currency',
  content_name: document.title,
  content_type: 'product',
  content_ids: '[productA.id, productB.id]',
  contents: '[{id: productA.id, quantity: product.qty, item_price: productA.price},{id: productB.id, ...}]',
  num_items: 'order.products_count'
}
{
  source: 'website',
  value: 'order.total',
  currency: 'store.currency',
  content_ids: '[productA.id, productB.id]',
  contents: '[{id: productA.id, quantity: product.qty, item_price: productA.price},{id: productB.id, ...}]'
}
{
  source: 'website',
  value: 'order.total',
  currency: 'store.currency',
  content_name: document.title,
  content_type: 'product',
  content_ids: '[productA.id, productB.id]'
  contents: '[{id: productA.id, quantity: product.qty, item_price: productA.price},{id: productB.id, ...}]',
  num_items: 'order.products_count'
}
and a second parameter:
{
  eventID: purchase_'store.code'_'order.showid'
}
{
  source: 'website',
  value: 'order.total',
  currency: 'store.currency',
  content_name: document.title,
  status: 'registered'
}
{
  source: 'website',
  value: 'order.total',
  currency: 'store.currency',
  content_name: document.title
}
For more information about events, please review Facebook’s support documentation:
Meta Pixel Helper - to debug all browser events on your Chrome Browser
Why am I not receiving server events?
If you use the Meta Pixel Helper, you will only see events sent by the Pixel, meaning those sent via the browser. The best way to validate everything is to test events in your store as if you were a real buyer. This way, you can view all triggered events directly in the Events Manager of your META account. If you want, you can download a report with the data of each event by following this path: Ads Manager > Events Manager > Data Set > Select the Pixel > Select the event > Export Data.
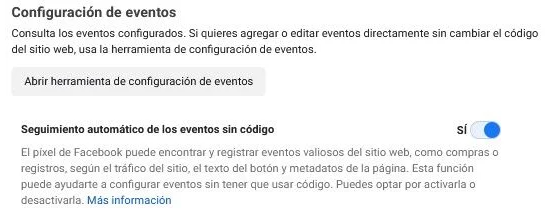
Browser events are sent alongside server events (deduplication), causing inconsistencies in the data.
In this case, we recommend disabling the “Automatic Event Tracking without Code” option. Jumpseller manages all events with our own code, so Facebook should not track additional button clicks or page views.It is important to note that we only send events via the browser or the server, never both simultaneously, so the deduplication process does not apply.
For more information on how deduplication between the pixel and API works, you can consult this official Meta documentation
How do I deduplicate events?
Since there is no double sending (client + server), it is not necessary to activate deduplication at this time; this is consistent with the current setup and a good sign that the configuration (using only the API) is working properly. Still, if you want to go beyond what our integration offers and customize events, this must be done manually on your own or with the help of a specialized marketing agency. Click here to find a complete list of recommended professionals.
If you still have questions, please contact us and we will get back to you as soon as possible.
Start your free 7-day trial. No credit card required.