How to setup Stripe Connect for your Online Store
A developer-friendly way to accept payments online and in mobile apps. Stripe processes billions of dollars a year for thousands of companies of al...
Klarna is a payment method that allows payments in X amount of days and installments, depending on the customers’ choice. This guide is divided into four sections: creating an account, configuring Klarna Payments as a payment gateway, capturing payments, and setting up on-site messaging.
To sign up for Klarna’s Business Section, head to the Klarna website and click on the Get started button. You’ll need to provide your email, the URL of your store (i.e., the address of your store on the internet), the country in which your store is based, and an estimate of your annual income. On the next screen, you’ll need to select your type of business: the most common option is “None of the above.”
On the following screen, you’ll need to select your platform. Select “Other integration solutions” and pick Jumpseller, if you do not see Jumpseller, select “Own built integration” click next and Complete the remaining questions, and your account will be pending until Klarna confirms its creation, usually via email.

Once you’re able to log in to your Klarna Merchant Portal, you’ll see the following screen:

To improve the safety of your account, we recommend following security measures such as enabling two-factor authentication.
To set up your store with Klarna Payments, navigate to the Settings section on the navigation menu and then go to the Klarna API Credentials subsection. Here, you can create the keys needed to connect your store with Klarna Payments.

Once you’ve created a new pair of credentials, it’s important to save both the Key and Password in a secure location. Please note that the Password will only be visible at this stage. If you forget or lose the Password, you’ll need to generate a new pair of credentials.
To connect your Jumpseller store with Klarna Payments, go to your Jumpseller Admin Panel and navigate to Settings > Payments. Then, insert your Klarna API Username (UID) in the Merchant ID field and your Klarna API Password in the Shared Secret field. On this screen, you’ll also find links for the terms and conditions. These links should be in the format of your store’s URL + “/terms-and-conditions.” For example: https://myjumpsellerstore.com/terms-and-conditions
If needed, you can always edit these terms and conditions by going to your Jumpseller Admin Panel and clicking on Legal.

EMD (Extra merchant data)
These fields are not a mandatory for Jumpseller. However, you may be required to mark one or more, based on your Klarna contract. To get more information about a certain EMD you can click on the hyperlink next to it.

After adding your credentials, you will find some EMD boxes to checK. In some cases, Klarna requires additional information regarding the customer and the purchase in order to make a correct risk assessment. This information, called extra merchant data (EMD), may consist of data about the customer performing the transaction, the product/services associated with the transaction, or the seller and their affiliates. Please select the options according to your case. If you need additional information about this, please click on the link “here” at the end of each EMD package
Autocapture
When you capture an order, you confirm that the order has been fulfilled. This means that you’ve shipped the ordered goods to your customer. At the same time, it lets Klarna know that they should trigger a payout to you and charge the customer for the order amount.
If this section is left blank then the process of capturing the payment must be done manually from your Klarna portal.
After saving the settings, we strongly recommend creating a test transaction. If you can successfully navigate to the Klarna portal as a customer, this is confirmation that the integration was successful. If, after following these steps, you encounter an error during the transaction, please contact our support team. Be sure to include the URL of your store and, if possible, attach a screenshot that illustrates the error.
Once a customer creates an order using Klarna in your store, the order status in Jumpseller will be marked as Paid if Klarna authorizes the transaction. However, please note that an authorized transaction does not guarantee that you will receive the funds. You must manually capture the transaction in the orders management screen in your Klarna account to receive payment. Only fully captured orders will result in the release of funds. (Please keep in mind that this applies if the checkbox autocapture is not selected)

Log in to the Merchant portal.
Go to On-site messaging app, once you’re logged in, go to the Conversion boosters section on top or use the On-site messaging shortcut in the Tools section.
Select the store to be configured, now you can see the On-site messaging app on the on the sidebar, select a Store from the drop-down and click on Get started to begin with the activation.
Allowlisting your domain, you can now allowlisting the origin domain where our Web SDK will be used.
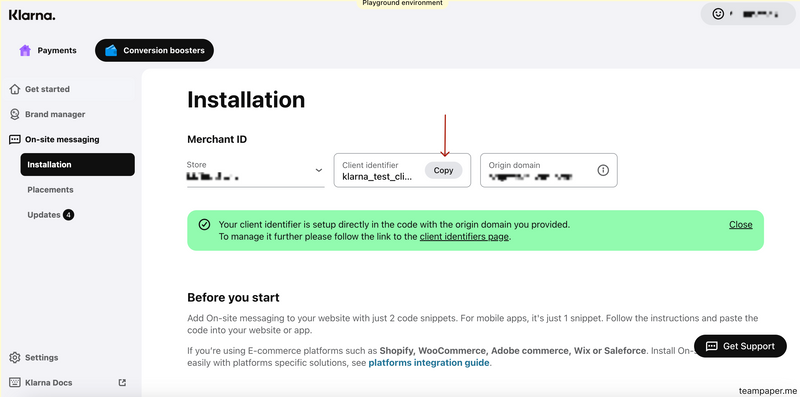
Obtain the client ID, on the same screen you can obtain the clint Id for the OSM.

Please go back to your Jumpseller store and be aware that this installation is for versions of the Simple theme prior to 4.2.2.
If your theme hasn’t been updated recently, you may be missing a few important additions. Follow these steps to update your theme code:
1. Update theme_data.liquid
theme_data.liquid file.Add the following two lines to the appropriate section of the file (see the image below for reference):
 "language": {{ languages.first.code | json }},
 "totalOutstanding": {{ order.total_outstanding | json }},

2. Update theme.js
theme.js file in the same code editor.Make the following two additions at the appropriate places (you can use the line numbers as a guide):
Add the following line to make the product accessible globally:
(window.storeInfo ||= {}).product = this.product;

Add this line to ensure cartData is available globally:
(window.storeInfo ||= {}).cartData = this.cartData;

This installation is for versions of the Simple theme after to 4.2.2
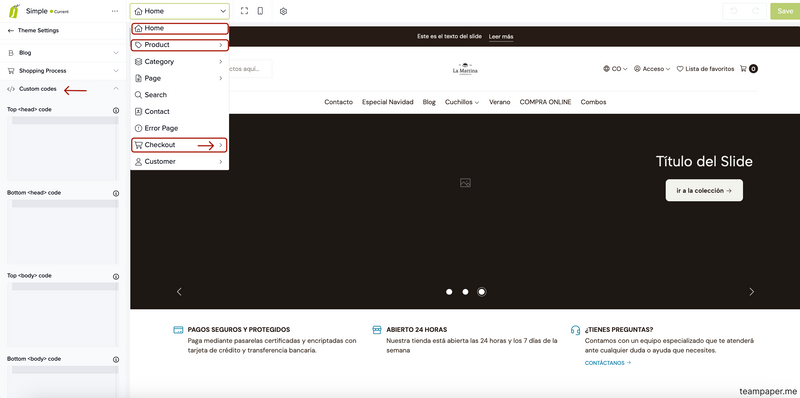
In the image, you will see the theme sections where you should insert the custom code. First, locate the section, then paste the code.

Home
In Theme Settings, navigate to Custom Codes (/general/custom-codes).
Add the following snippet to the Top head code section, ensuring you replace add_your_id_here with the client ID you received during the account creation process:
<script
  async=""
  data-environment="production"
  src="https://js.klarna.com/web-sdk/v1/klarna.js"
  data-client-id="add_your_id_here">
</script>
Home Layout
In the main layout, add a new Custom Code component.
Insert the following snippet and save:
 <klarna-placement
   id="klarna-header-placement"
   data-key="top-strip-promotion-auto-size"
   data-locale="en-GB">
 </klarna-placement>

 <script>
   const klarnaWidget = document.getElementById('klarna-header-placement');
   const locales = { "en": "en-GB", "pt": "pt-PT", "es": "es-ES", "fr": "fr-FR", "de": "de-DE", "it": "it-IT", "nl": "nl-NL", "fi":    "fi-FI", "sv": "sv-SE", "da": "da-DK", "no": "nb-NO", "pl": "pl-PL", "hu": "hu-HU", "cs": "cs-CZ", "sk": "sk-SK", "el": "el-GR",    "ro": "ro-RO" };
   klarnaWidget.setAttribute('data-locale', locales[window.theme.language] || "en-GB");
 </script>
Product Layout
Switch the layout using the selector on the top bar of the Visual Editor.
Select a product template of your choosing and create a Custom Code component within the product template.
Add the following snippet and save:
 <klarna-placement
   id="klarna-product-placement"
   data-key="credit-promotion-auto-size"
   data-locale="en-GB"
   data-purchase-amount="1">
 </klarna-placement>

 <script>
   const klarnaWidget = document.getElementById('klarna-product-placement');
   const locales = { "en": "en-GB", "pt": "pt-PT", "es": "es-ES", "fr": "fr-FR", "de": "de-DE", "it": "it-IT", "nl": "nl-NL", "fi": "fi-FI", "sv": "sv-SE", "da": "da-DK", "no": "nb-NO", "pl": "pl-PL", "hu": "hu-HU", "cs": "cs-CZ", "sk": "sk-SK", "el": "el-GR", "ro": "ro-RO" };
   klarnaWidget.setAttribute('data-locale', locales[window.theme.language] || "en-GB");
   window.storeInfo = window.storeInfo || {};
   Object.defineProperty(window.storeInfo, 'product', {
     set: ({ price, discount }) => {
       const total = Math.max(1, Math.round((price - discount) * 100));
       klarnaWidget.style.display = total > 0 ? 'block' : 'none';
       klarnaWidget.setAttribute('data-purchase-amount', total);
     }
   });
 </script>
Cart Layout
Add a product to your cart to proceed with the following steps.
Switch the layout to Checkout > Cart using the selector.
Create a Custom Code component, add the following snippet, and save:
 <klarna-placement
   id="klarna-cart-placement"
   data-key="credit-promotion-auto-size"
   data-locale="en-GB"
   data-purchase-amount="1">
 </klarna-placement>

 <script>
   const klarnaWidget = document.getElementById('klarna-cart-placement');
   const locales = { "en": "en-GB", "pt": "pt-PT", "es": "es-ES", "fr": "fr-FR", "de": "de-DE", "it": "it-IT", "nl": "nl-NL", "fi": "fi-FI", "sv": "sv-SE", "da": "da-DK", "no": "nb-NO", "pl": "pl-PL", "hu": "hu-HU", "cs": "cs-CZ", "sk": "sk-SK", "el": "el-GR", "ro": "ro-RO" };
   klarnaWidget.setAttribute('data-locale', locales[window.theme.language] || "en-GB");
   window.storeInfo = window.storeInfo || {};
   Object.defineProperty(window.storeInfo, 'cartData', {
     set: ({ total_outstanding }) => {
       klarnaWidget.style.display = total_outstanding > 0 ? 'block' : 'none';
       klarnaWidget.setAttribute('data-purchase-amount', Math.max(1, Math.round(total_outstanding * 100)));
     }
   });
 </script>
Checkout Layout
Switch the layout to Checkout > Checkout.
Create a Custom Code component, add the following snippet, and save:
 <klarna-placement
   id="klarna-checkout-placement"
   data-key="credit-promotion-auto-size"
   data-locale="en-GB"
   data-purchase-amount="1">
 </klarna-placement>

 <script>
   const klarnaWidget = document.getElementById('klarna-checkout-placement');
   const locales = { "en": "en-GB", "pt": "pt-PT", "es": "es-ES", "fr": "fr-FR", "de": "de-DE", "it": "it-IT", "nl": "nl-NL", "fi": "fi-FI", "sv": "sv-SE", "da": "da-DK", "no": "nb-NO", "pl": "pl-PL", "hu": "hu-HU", "cs": "cs-CZ", "sk": "sk-SK", "el": "el-GR", "ro": "ro-RO" };
   klarnaWidget.setAttribute('data-locale', locales[window.theme.language] || "en-GB");
   const total = window.theme.order.totalOutstanding;
   klarnaWidget.style.display = total > 0 ? 'block' : 'none';
   klarnaWidget.setAttribute('data-purchase-amount', Math.max(1, Math.round(total * 100)));
 </script>
To ensure that all the changes made are saved, remember to click on the save button after each modification.
If you have other theme in your store or if face any difficulty in doing so, don’t hesitate to contact our support team for assistance.
Free trial for 14 days. No credit card required.