8 Big Mistakes to Avoid When Selling on Instagram
If you are looking to start a business on Instagram, you must avoid these common mistakes in order to be successful! Instagram is a rapidly growing...
This sales channel lets you sync products on your Jumpseller store onto Facebook and Instagram via a Catalogue. Once a catalogue is created, you can list and manage products from your Jumpseller admin. More importantly, you will be able to easily create Advantage+ Ads on Facebook and Instagram.
This feature uses the information (images, product name, description, links etc.) from your Catalogue to generate automated Ads. Use these Ads to increase your reach across Facebook and Instagram and boost sales. In summary, using this sales channel you can do the following:
Easily sync products between Jumpseller and Meta
Sell the products from your online store on these platforms without having to manually upload them. It automatically synchronizes your catalogue from your store with Facebook and Instagram.
Create Product Sets
Once your catalogue is synced, you can create Product sets to use with different campaigns. This narrows down which products from your catalogue may appear in the ad. Product set filters are dynamic, so over time when your catalogue is updated the products in your set will update as well.
Increase your sales with Advantage+ Catalogue Ads
Formerly known as dynamic ads, Meta Advantage+ catalogue ads use machine learning to scale your ads when you have a broad range or large volume of products. With this you can; personalise your ads, drive more sales, and retarget visitors.
Note:If you are subscribed to plans Plus, Pro or Premium and you don’t have a domain yet, you can request one for free in your admin panel.
You need to have a custom domain before you can use the Facebook and Instagram sales channel. Use our guide to set up a domain with Jumpseller.
Note: It can take up to 48 hours for a domain to be configured. Which is why you might not be able to complete the setup immediately.
If you already own a Domain and it is setup with Jumpseller, you can skip to the next step.
From your admin panel, click “Sales Channels” > “Facebook & Instagram” > Install App

Once you have Authorized the installation, you can configure your Facebook business administrator account.


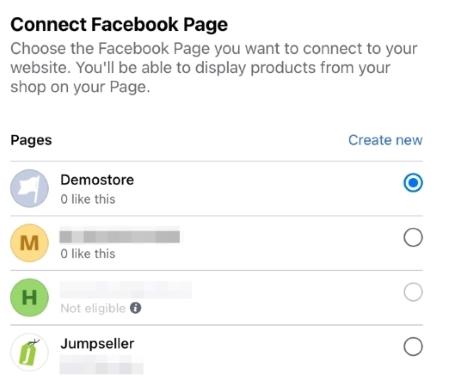
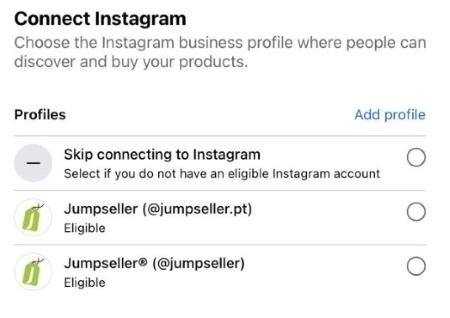
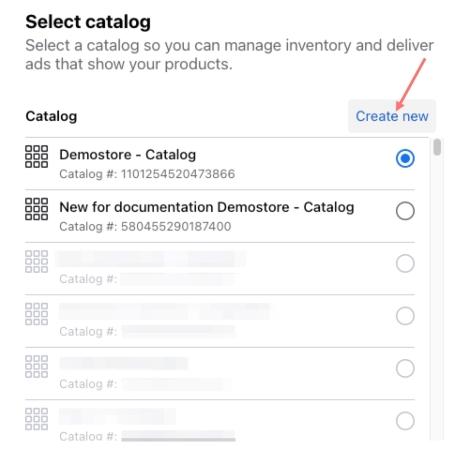

Note: Facebook has a limit on how many Ad accounts can be connected to a business account. If you have multiple Ad accounts that you want to use with the same Facebook Business account, please contact Facebook support.


That’s it, you will see a Congragulations page, from here click Go to Facebook Menu.
If Meta’s automatic verification of your domain fails, follow the instructions that are shown in the warning message that will appear.

Use your product catalogue to scale your creative and personalise ads for every potential customer. Increase your sales with personalised ads. Formerly known as dynamic ads, Meta Advantage+ catalogue ads use machine learning to scale your ads when you have a broad range or large volume of products.
Click on the Create Ads button.


After that, you just have to configure some options like the Call to Action button you want your ads to show, tracking for your ads and if you want to change the target link for your Ads from the specific product pages to something else.
Note: By default, any product created or updated on Jumpseller, with the status of Available, will be created/synced to your Facebook Catalogue.
The Facebook catalogue section will take you to the product catalogue in your Meta account, where you can see all products synced with your Jumpseller store.

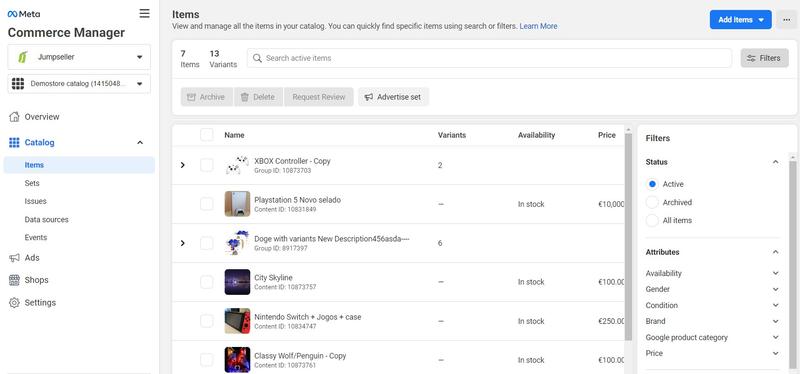
By clicking on a product, you can see its details.

Forbidden Products: Meta has a list of products you can’t publish in their system. This list includes Digital Products, Services, Tobacco, and other adult products. Review the complete list in Facebook Commerce Policies.
You can also create product sets from your catalogue, with a product set you can group products in your catalogue. This can be used to feature certain products in your ads. You can do this by applying filters to control which products from your catalogue are added to a set. For example, you could filter all women’s shoes that cost less than USD 100.

Product set filters are dynamic, so the products in your set may change over time when your catalogue is updated. For example, if a new product is added to your catalogue later and it meets the filtering criteria, that product will be added to the set.
Learn more about How to create and edit product sets in your catalogue in Commerce Manager
You can use the catalogue Diagnostics section to view pending issues or opportunities within your Facebook catalogue. Each issue is listed with a severity degree, the number of items affected, and a brief message, making it easy to understand and fix.


To better understand a certain issue, you can also click on the More Information button to access Facebook’s documentation about it.

After you have corrected the problems, you can return to this page to check that they have indeed been resolved. To ensure that your items are displaying, make sure that you have resolved any problems that may appear on the catalogue Diagnostics page.

In the Product List section, you can filter products by status or search by name, to check if they are properly synchronized or if any corrections need to be made if the update failed.

To sync an individual product from your store to your Facebook catalogue, toggle it and click Sync to catalogue.

From the Massive Actions section, you can export and synchronize all your products with one click! You can also Verify and Fix inconsistencies in products, such as price differences and products not synced correctly.
To sync all products from your store to your facebook catalogue, go to the Massive Actions page and click on Synchronize Products.

In the Settings section, you will see a count of products by status. That is, you can see how many products are synchronized, pending synchronization, not synchronized (failed) and deactivated/digital. Remember that deactivated and digital products are not sent to Meta.
In this section, the names and IDs of your assets in Meta (Business Account, catalogue and Pixel) are recorded. This information is important to quickly identify which assets from your Meta account are connected to your Jumpseller store.
You will then see the Management button, which will take you to your Meta business account, and a button to reset the app in your Jumpseller store if you need to change your account or initial configuration.

There is also a button to review your Meta account and the most recent assets that require your attention because they do not comply with Meta’s advertising policies and other standards.
In the main menu of the Jumpseller integration, you can access the Meta Business Suite.

As of 10 August 2023, Meta is phasing out the onboarding of new shops without Checkout with Facebook or Instagram. Facebook and Instagram Checkout is only available in some regions worldwide and only with select partners. From now onwards, businesses can use Ads to enable new and existing customers to discover products at scale through an experience that is independent of Shops.
Go to Business Setting on your Facebook Business Manager Page and click Accounts > Instagram Accounts and click Add. Fill out the details of your Instagram account to associate it with your business account.


As of 10 August 2023, Meta has a new policy which limits the product tagging feature to only accounts that have access to shops. “Businesses without an accessible shop will no longer be able to use features associated with Shops, including product tagging (in posts, reels and stories) and creating new custom or lookalike audiences derived from people who visited a shop.” Meta support
Please follow the steps described on the Instagram help page to unlink. To link, you should always do it through the Facebook & Instagram Sales Channel Setup.
To verify the ownership of a Domain found in Jumpseller, go to Business settings and select from the list of verification options: Update DNS TXT record with your domain.
Facebook will indicate a DNS record of type TXT, similar to the following: facebook-domain-verification=xxxxxxxxxxxxxxx
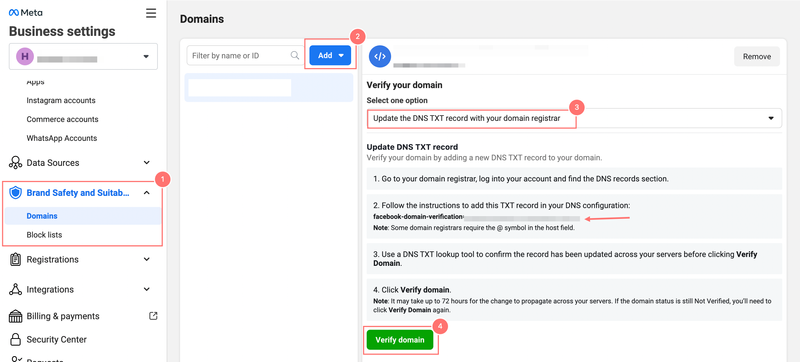
Next, you must follow this procedure:
Go to your Admin Panel > Settings > Domains.

Choose your domain and go down to the section called Advanced DNS Configuration
Create a new entry, the Host value must be Blank, Type must be TXT and value must be the Facebook code you copied on the facebook page.

Save the changes, go back to the Facebook page and click Verify domain. The change can take up to 72 hours to propagate on your servers. If the status of the domain remains as “Unverified”, you need to click “Verify domain “ again.
You can use our WhatsApp Business integration to engage more wtih your customers by sending order notifications.
To connect a Facebook Page to your WhatsApp, you can follow the Connect your Facebook Page to WhatsApp guide.
If you want to import a catalogue to WhatsApp you can do that by following the steps on How to create and maintain a catalog.
Please make sure you have disabled all / any ad blocker in your browser, and enable the option to save and read cookies in your browser, while configuring the Facebook application.
Our integration with Facebook and Instagram consists of two parts: one is the pixel and the other is the conversion API, i.e. some events are sent through the pixel (from the browser) and others through the API (from the server).
If you want to know which events we send to Facebook, go to this list.
Events are presented when triggers are activated, i.e. when there is information being sent to Facebook. You can see in the “Source” column above, that most events are presented by the server (we do not send events to the server and the browser at the same time). Other than the above, we do not recommend using the Facebook Pixel Helper tool or the test events tab in Pixel to analyze the events. It is preferable to use the Meta event manager tool.
If you are creating custom events that we have already sent through the API, these may be deduplicated and this may cause the integration to not work properly or you may receive confusing/incorrect information in the Meta event manager. Go to this help page for Meta companies
Our integration already does all the configuration and event submission in an automated way when you install and configure it in your store, but you won’t be able to see this in the code editor, since everything is done “behind the scenes” in the admin panel. If you have manually inserted pixel code into your Jumpseller store or created manual events in your meta pixel, we recommend deleting the code you manually added to your store and deleting the events created using the event configuration tool below: Use the Facebook online event setup tool.
As of August 10, 2023, Meta has decided that Facebook and Instagram Shopping will no longer be available in some countries. You can check the list of markets supported by the commerce platforms on Facebook here. Additionally, you can review Meta’s official announcement here.
You can also consult the Facebook Merchant Terms and Conditions.
Facebook provides some recommendations to have the best chance of being approved.
If you need to contact Meta’s customer service to resolve an issue or have questions about your account, follow these steps:

Then, scroll to the “Still need help?” box and click “Contact Support Team.”

If you need further assistance, you can contact our support team.
Start your free 7-day trial. No credit card required.