Setting up a Corporate Email
A personalized email is inexpensive and easy to get. By using email hosting softwares such as Zoho, Google Workspace, Office 365, and Fastmail, you...
With the help of Zoho, you can set up businesses and companies, create and use your own domain business communications (for example, your name@yourcompany.com). Zoho also offers a wide variety of applications apart from mail services, but they depend on the package you subscribe to. Zoho Mail is in high demand because it is free for up to 25 mailboxes and offers 5 GB of free storage.
You must create a Business Account with Zoho Mail.

Jumpseller is not a Domain Provider, so you must have a custom domain that you can also purchase from the Zoho platform.

For more information on the features included in the different plans, see the Zoho Pricing
Watch the video to learn how to create an email account with Zoho.
Zoho wants to make sure that you are the owner of the domain before adding it to their system. In order to do that, it will offer you a variety of methods.
In this guide, we will show you two methods that are very similar to CNAME and TXT.
If you have a store in Jumpseller, your domain can either point to Jumpseller from an external Host (like Godaddy or a Cpanel) or can be hosted in our servers. This guide is only for domains hosted in our servers. You can easily verify if this is the case if in your Domain Settings in Jumpseller, the configuration method is called Nameservers.
If the method is called DNS records, then you will have to do the setup in your domain hosting provider following very similar steps.

When creating a Zoho Account you will get prompted which method you would like to use, choose any of the following. Sometimes Zoho will ask you which platform you are using prior to this step, in that case you will choose: Other (Jumpseller is not currently on that list).

Then copy the data that we will use in the verification.

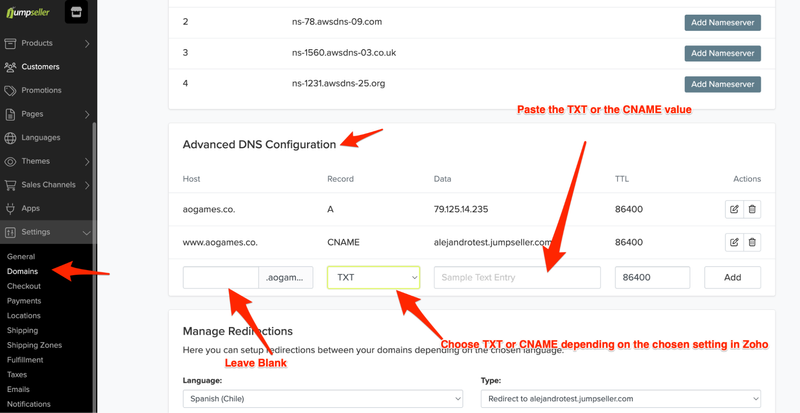
Then introduce the data into your Domain Settings in Jumpseller.

Go back to Zoho and finalize the setting:

Once you’re done with domain verification, the next step to consider is setting up email delivery. MX record entries are special DNS server records that designate recipient email servers for your domain. As seen in the image below, you can change MX records after creating all user accounts and email addresses in Zoho.

Go to the Jumpseller administration page, in the section Settings ** and then **Domains. Click on your custom domain to enter its configuration.
In the lower section called Advanced DNS Configuration you will select MX from the “Record” drop-down list.
Leave the Host column blank. And in the column Data exactly this:
10 mx.zoho.com.
20 mx2.zoho.com.
Then you click Add.
The MX configuration should look like this:

Go to the Jumpseller administration page, in the section Settings and then Domains. Click on your custom domain to enter its configuration.
In the lower section called Advanced DNS Configuration you will select TXT from the “Record” drop-down list.
Leave the Host column blank. And in the column Data exactly this:
v=spf1 include:zoho.com ~all
Then you click Add.
The configuration should look like this:

Follow these steps to generate a unique domain key in Zoho Mail:
Login to Control Panel from https://www.zoho.com/mail/cpanel-login.html with administrator credentials.
Select Email Authentication and choose DKIM to navigate to the DKIM configuration page.
Click the Edit icon for the domain for which you want to configure DKIM.

Click Add selector to add a new selector for the domain.
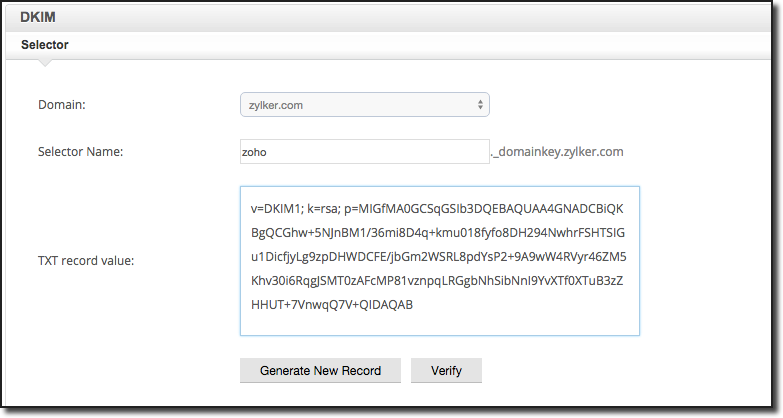
Provide the name of the selector, for the domain that will be used with Zoho Mail. We recommend typing: zoho
Click Save. A text box TXT record value is displayed with the public DKIM key value.
You can copy (right click » Copy) full text in the value field of the TXT record.

Go to the Jumpseller administration page, in the section Settings and then Domains. Click on your custom domain to enter your configuration.
In the lower section called Advanced DNS Configuration you will select TXT from the “Record” drop-down list.
In the column Host write exactly this:
zoho._domainkey
In the column Data you must add the value that you copy for the TXT in the Zoho admin panel.
Then you click on Add.
The registry settings should look like this:

For more information or questions contact: Zoho Support.
Free trial for 14 days. No credit card required.